Monday, July 18, 2011

How to Debug or Run Android application (.apk) on your own Android device from Eclipse

outcome: Click debug, Eclipse will install and run the application from your phone and not virtual device.

Requirement:
Window 7
Eclipse
sync cable (from pc to your phone)

1. Change your phone setting to debugging mode
(Look at your phone)
  • Application->Settings->Applications
    Check "Unknown sources" (unchecked by default for security purposes)
  • Application->Settings->Applications->Development
    Check "USB debugging", I checked "Stay awake" too.
    make sure my phone stay awake when i'm working... train my phone not to be lazy!!! lol~~

2. Make your USB detectable by your pc.
(Although your device might show connected to your pc, if you check on Eclipse debugger list, you can't find your device, some driver is required to be install)
    1. In Eclipse, go to Window->Android SDK and AVD Manager->Available Packages->Third party Add-ons->Google Inc. (dl-ssl.google.com)->
    2. Only Check on Google USB Driver package, revision x.
    3. Click "Install selected".
    1. In Windows,Go to Start->Control Panel->Device Manager
    2. Look for your devices, I'm using Nexus S, so i find my device at Other Devices->Nexus S
    3. Click on the device, and click Update Driver Software at the top
    4. Choose "Browse my computer for driver software"
    5. look for the Google USB Driver package that you just download from Eclipse located at \google-usb_driver\
      (eg..C:\Android SDK\android-sdk-windows\google-usb_driver)
    6. Check or no check subfolder, up to u la. (I checked)

  • Last part, go back Eclipse to check if your device is available in the list.
    1. Go Run->Debug Configurations...
    2. Target tab->Deployment Target Selection Mode set to Manual
    3. Click Debug (At this point, make sure device is connected to pc, debugging mode from your device is ON)
3.Make your application debuggable
(Back to your project)
  • Before you debug
    1. Go to AndroidManifest.xml of your application
    2. Select Application tab
    3. Debuggable field select "true"


That is it, try debug your project, .apk is now installed and run on your device.

Thursday, April 28, 2011

Android Development forecast 1st half 2011

Do you think you are worth to be the Android developer better than iApps Developer?
Several opinions make you feeling it make sense.
1. USD25 lifetime as an Google Android market developer (Apple USD99 per year)
2. Base on the graft below, the blue line shows Android development forecast whereas Apple App Store development for iPhone is shown on the top, green line. We probably can see that the development of Android is growing sharply upwards and they predict that July will overtake Apple App Store Development.


source: cnet News

Saturday, April 9, 2011

Accessing Emulator File System

In Eclipse, we are wondering where those files or mounted drive save at?
Is it any folders in Windows? Is not actually a folder, I can said is kinda virtual.

This post shows you how to enter the file system.
Is very easy actually.

Launch your emulator,
Window > Open Perspective > DDMS
or you may find an android at the top right like below


Please look for the File Explorer, all of the files and folder are located there.
If you would like to find all files that created during your testing and saved into the emulator, please find it under
data/data/your project package/files

If you want to check for the external storage or new mounted volume like sdcard, please find it under
mnt/
(at least mnt/sdcard/LOST.DIR will be available if you inserted any sdcard into the project, want to know how, please go add sdcard in android emulator / setup sdcard)

Add SdCard in android emulator / Setup SDCard

For Windows + Eclipse user only,
others please refers to http://www.brighthub.com/mobile/google-android/articles/33240.aspx


To create SDCard is quite straight forward, cause you just have to follow as below.

Go to C:\[SDK dir]\android-sdk-windows\tools
mksdcard 512M mysdcard.iso


you may check with dir/w to see if the *.iso is created.

Choose either 1 way,
1. Use existing avd and mount the sdcard with command line
2. Create a new AVD

1. Use existing avd and mount the sdcard with command line
Go to your Eclipse, right click the project that you want to inject the sdcard.
Choose Run As > Run Configurations...


go to the Target tab in the middle
type in the command line with
-sdcard [dir]/mysdcard.iso
For my example, i make an extra step which is paste the created mysdcard.iso into the project like paste to C:/Users/Rickie/workspace/Helloworld/mysdcard.iso

I use this step to avoid spacing, the command line now will be -sdcard "C:\Users\Rickie\workspace\HelloWorld\mysdcard.iso"
Please let me know if you know how to avoid spacing, looks like i can't avoid it although I use "double quote"
2. Create a new AVD
Go to Window > Android SDK and AVD Manager and create new Android device.
If you don't know how to create AVD, please go Create Android Virtual Device(AVD) .
In “SD Card” option specify “File” and navigate to sdcard.iso created earlier.


When you done adding sdcard, I'm sure you want to check if the mysdcard folder already inside the FileSystem.
If you not sure how, please refers to Accessing Emulator File System.

Or you can just start the emulator, check on the setting > SD card & phone storage settings to check if the SD card is mounted.

Tuesday, March 1, 2011

Android Phone Suggestion

Always got people ask me about which is a good phone to use? And i asked myself what is a good phone for development. So I decided to make this post.

All phone suggested below is my own opinion, I'll try to list out all android phone which up to date and which good for developer. All will be my own view, if you feel annoying, nasty, don't screw me please.

So far I only view several brands of mobile phone, so if you want me to comment on some new or rare model, drop me an email / just comment it.

As an Android developer, I will not talk about IOS, Windows Phone 7 and Symbian. I'll only focus on Android phone. All phone information are grabbed from http://www.gsmarena.com/ and http://www.engadget.com/

My Choice
  • Samsung Galaxy S II (released date before May - source)
    check the spec yourself. I like it because of Android 2.3, NFC enabled, bigger and screen, stronger battery life, greater camera than Samsung Nexus S. Only lack is, it is not a Google phone.

Developer View of Choice
  • Samsung Nexus S - Google Phone, can get fastest update for Android, 1Ghz CPU speed and 16GB internal Storage, NFC enabled; come originally with Android 2.3 (GingerBread)
  • HTC Nexus One - Google Phone, can get fastest update for Android, 1Ghz CPU speed and only using card slot for memory (microSD); come originally with Android 2.1 (Eclair, update-able to 2.3 Android)
  • HTC Sensation - come with HTC Sense v3.0, 1.2 GHz dual-core processor, bigger screen; come with Android 2.3 (GingerBread)
Nexus One is cheaper and with HTC Sense which I felt user friendly, so you may take it into consideration.

User View of Choice
  • HTC Flyer (probably in 2.4 - GingerBread) - stylus (Scribe technology) touch my heart
  • LG Optimus 2X (2.2 - Froyo) - Tegra 2 chipset by NVIDIA for gaming
  • Motorola Xoom and Samsung Galaxy Tab 10.1 ( 3.0 - HoneyComb) - I'm a bee, honey ask me come closer; but it is a huge hand held device, good for those who want to show off. (Expected April 2011)
  • Motorola Milestone 2 (2.2 - Froyo) - Suit for those who expect to have a qwerty keyboard in his phone
  • SE Xperia Arc (2.3 - GingerBread) - Stylish design.
  • HTC Incredible S (2.2 - Froyo, upgradable to 2.4) - design really not bad and with an affordable price

Good But Not Advisable
  • HTC Thunderbolt 4G - lack of battery life; for phone dialing, using CDMA only but not GSM (Expected April 2011)
  • HTC Desire HD - lack of battery life
  • Dell Streak - weird design and special size, 5inch; I saw Android v1.6(upgradable). lol~~
  • SE Xperia Play - Is a gaming device, if you are a gamer, i suggest you buy PS3 or NGP + a normal phone take can make phone call and sms.... enough already.

Updated 28/4/2011
Please let me know if this post is outdated. Thanks.

Statistics (2009 - Jan 2011)

The following video showing data visualization of Android activation all over the world.
With this video, you can see that Android user groups are growing larger and larger, soon Android will cover all over the world and become very common in fact.

This makes us will not regret to become one of the Android developer.
Hope this video may motivate you to go further.


Regarding to Gartner: Android smartphone sales surged 888.8% in 2010. source: 9-Feb-2011
So what are you waiting for to become another Android developer?
Lets the open source keep rolling and show everyone your creativity.

Friday, February 25, 2011

Create Android Virtual Device (AVD)

Today topic will cover on how to create a new project in Eclipse (Helios 3.6) with develop an apps called Hello World.
Tips: You may skip any of the sentence with gray in color if you want to have a fast tutorial

*If you are a typical programmer, sure you will know what is Hello World. Hello World is the simplest program/ application that can be ran without error for testing purpose. For me, it is a program that shows the whole picture how an application works. To those who want to know more, this is a full description for it.

Todo List
  1. Create Android Virtual Device(AVD) - one AVD can be used for all applications
  2. Create New Project
  3. Insert programming coding to shows Hello, World! using HelloWorld.java
1. Create Android Virtual Device(AVD)
  • In Eclipse, choose Window > Android SDK and AVD Manager.
  • Choose Virtual Device in the left panel and click the New button at the top right.
    A Create new Android Virtual Device (AVD) window will pop up.


  • Type Name such as myavd, select target (i personally choose Android 2.1-update, this is the Android version you want to run in your emulator)
    All other boxes below can let it as default, then click Create AVD


  • Click on the created AVD (myavd) and click Start... if you want to run the emulator. It took me more than two minutes to boot up the emulator using my fsl (f**king slow laptop)! Hopes that it is not happen to your pc, if not, just please be patient.

Friday, February 18, 2011

Add / Open SDK ApiDemos work with your Android emulator - Eclipse

After we download the Android SDK package, we know it contains lots of subfolder inside until we decided to ignore it. But do you know that actually it contains a lot of tutorials, sample coding and documentations inside the android-sdk-windows folder?

Today I want to log on how to open the Android API Demo in [Dir]\android-sdk-windows\samples\android-8\ApiDemos
And then install into your emulator so that you can test/try everything they provided.

The end result you should see something like this.


Go to File>New>Android Project and click it.


A pop up screen will be prompt for you to add new project.
You have to insert the project name as you like ApiDemos for example.
1. Select Create project from existing source
2. Check Android 2.2 (for api 8, version 2.2 is enough)
3. You must select the folder which contains AndroidManifest.xml build and run purposes


So look for the "Browse..." button and for the sample folder in android-sdk-windows, the AndroidManifest.xml for apidemo 8 located at android-8>ApiDemos


And then click Finish. Once the file is completely import into Eclipse, now we have to run it.

Notes: Initially, the ApiDemos folder will not contains the android packet (*.apk), so you have to run atleast once in Eclipse. So you may install the *.apk straight away either in the device or for future use without running it again using any IDE.


Look for the ApiDemos.java within src>com.example.android.apis


After Open it, then Run the file using the icon on the top of the application.

Run as the Android Application and click OK.


Notes: Once you click OK, Eclipse will auto search for the most suitable AVD - Android Virtual Device (track by api Level and android version) that you created to install this application.


If the system found that no match in the list, a pop up screen will ask you to create a new AVD with suitable api.

In this case, we use level 8 api. Please click yes to link in to the avd manager or you can find in the toolbar on the top (same row with the Run icon, the icon with a white arrow pointing downwards)
To create AVD, please follow this link - Create AVD

After AVD creation, kindly close the window, a another screen will ask you to choose a suitable AVD, click the refresh button and choose the AVD you have just created.
(You may facing some unknown problem if your computer is out of memory, so please go to the avd manager, start and launch the emulator yourself, close it and open the second time if the Not Responding problem still happening, Cause recently i'm facing this problem)

Yes, unlock the screen, and tap the application icon, now mostly you may get to the page..

Wednesday, January 12, 2011

Hello Columns and Rows

In this session, I'll mostly cover on a simple design to fit your android phone screen by using columns and rows. Some good and bad examples will be provided to show the xml design outline.

Tips: Some key words you need to pay attention on:
-LinearLayout
-TextView

-fill_parent

-wrap_content
-android:layout_weight

The end product for this session should be something like this.


The following steps are showing you the ways from a simple 1 row for whole screen to the end product as above, you may skip all steps and go to Step 4 to see the code for end product.

Step 1
- Understand and display the simplest layout
Lets make a new project called HelloRCT (Hello Row Col Tutorial).
Then as usual, go to main.xml, click on the main.xml beside the Graphical Layout at the bottom left, then you should see something like this as default.
If you do not know where to find the main.xml or Strings.xml, please read Display Hello World via XML layout
<?xml version="1.0" encoding="utf-8"?>
<LinearLayout xmlns:android="http://schemas.android.com/apk/res/android"
android:orientation="vertical"
android:layout_width="fill_parent"
android:layout_height="fill_parent"
>
<TextView
android:layout_width="fill_parent"
android:layout_height="wrap_content"
android:text="@string/hello"
/>
</LinearLayout>

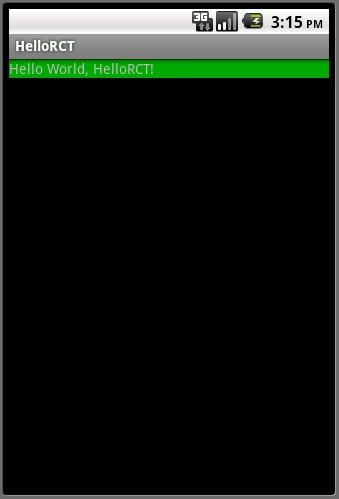
If we say it visually, it is something like figure on the left. After we run the application, to make the view clearer, i change the textview background color (android:backgroud="#00aa00") to green as shown on the right figure.


Step 2 - Insert more Rows
So what will happen if two TextView tag are put under the LinearLayout tag?
Copy whole <TextView ... /> tag and paste right after it where before </LinearLayout> and change the android:background to yellow (#aaaa00), then run the application, then you should get something like the figure below.


Good, lets edit codes now.
Assume we got a code likes below,
<?xml version="1.0" encoding="utf-8"?>
<LinearLayout xmlns:android="http://schemas.android.com/apk/res/android"
android:orientation="horizontal"
android:layout_width="fill_parent"
android:layout_height="fill_parent">
<TextView
android:layout_width="fill_parent"
android:layout_height="wrap_content"
android:text="@string/hello"
android:background="#00aa00"
/>
<TextView
android:layout_width="fill_parent"
android:layout_height="wrap_content"
android:text="@string/hello"
android:background="#aaaa00"/>
>


change the android:orientation="vertical" to "horizontal", but due to the android:width="fill_parent", the second column will be pushed outside the screen.
Logically is something like below, in fact, it is a human error which you will not see the second column.


Two ways to solve this problem, either you change android:width="fill_parent" to "wrap_content" or you may fit both columns in the screen with adding android:layout_weight.

android:layout_weight is used to fit everything into the screen with ratio.
For example, add another line in both tag,
<TextView
android:layout_width="fill_parent"
android:layout_height="wrap_content"
android:text="@string/hello"
android:background="#00aa00"
android:layout_weight="1"
/>

this is the ratio of 1:1 to share and fit the screen.

You may try to edit the layout_weight ratio to 3:1 and see the effect.

The ratio of 3:1 is actually can change to percentage to increase your own understanding.
from ratio 3+1, total 4 divided by 100 means ratio = 75:25.

Here comes the common confusion, the keywords to look for: 1. android:layout_weight beginner's question 2. bigger number of android:layout_weight should increase the area, but it decreases. 3. android:layout_weight best practices.

Aren't your application showing something out of your expectation?
E.g I'm using ratio 3:1 or 75:25, left figure is the result.

We are wondering why 75 out of 100 will gain smaller space than 25 out of 100.

The key is "Weight"!
If something heavier (higher weight), means it will falls downwards more than others.

The example showing the green path (75%) is heavier than the yellow(25%). So the yellow path will visually took 75% and green path took 25% .

So please be reminded the keywords weight = how heavy the path are. I'll show you two different examples which left figure will be horizontal and the bottom figure will be vertical under android:orientation in the LinearLayout.
top figure is android:orientation="horizontal"

<LinearLayout xmlns:android="http://schemas.android.com/apk/res/android"
android:orientation="vertical"
android:layout_width="fill_parent"
android:layout_height="fill_parent">

So as you can see, since the weight is always about something heavy pushing downwards, so the green path will gain 75% of the screen and yellow path gain 25%

<=android:orientation="vertical"


Step 3 - More LinearLayout
Once you understand the concept of up, down, left and right, now try to make it two (2) columns on the top and one (1) row at the bottom without any assistance from this post. The product should be like the figure below.


Nested LinearLayout will be used to separate more field and makes it looks more flexible.
The code is shown below.
<?xml version="1.0" encoding="utf-8"?>
<LinearLayout xmlns:android="http://schemas.android.com/apk/res/android"
android:orientation="vertical"
android:layout_width="fill_parent"
android:layout_height="fill_parent"
>
<LinearLayout
android:orientation="horizontal"
android:layout_width="fill_parent"
android:layout_height="fill_parent"
android:layout_weight="50"
>
<TextView
android:layout_width="fill_parent"
android:layout_height="fill_parent"
android:text="@string/hello"
android:background="#00aa00"
android:layout_weight="75"
/>
<TextView
android:layout_width="fill_parent"
android:layout_height="fill_parent"
android:text="@string/hello"
android:background="#aaaa00"
android:layout_weight="25"
/>
</LinearLayout>
<LinearLayout
android:orientation="vertical"
android:layout_width="fill_parent"
android:layout_height="fill_parent"
android:layout_weight="50"
>
<TextView
android:layout_width="fill_parent"
android:layout_height="fill_parent"
android:text="@string/hello"
android:background="#aa0000"
/>
</LinearLayout>
</LinearLayout>


Step 4 - Organize the words, text color, background and whole picture.
Go to the strings.xml, set your own sentances. No idea how to do it? please refer to Display Hello World via XML layout

Cheat code:
<?xml version="1.0" encoding="utf-8"?>
<resources>
<string name="hello1">Hello World, Hello Column1!</string>
<string name="hello2">Hello World, Hello Column2!</string>
<string name="hello3">Hello World, Hello Row1!</string>
<string name="hello4">Hello World, Hello Row2!</string>
<string name="hello5">Hello World, Hello Row3!</string>
<string name="app_name">Hello Row and Col</string>
</resources>


Create a new colors.xml to store all colors you have. No idea how to do it? Please refer to Different font style using HTML tag and change background color

Cheat code:
<?xml version="1.0" encoding="utf-8"?>
<resources>
<color name="red">#aa0000</color>
<color name="green">#00aa00</color>
<color name="purple">#aa00aa</color>
<color name="yellow">#aaaa00</color>
<color name="blue">#0000aa</color>
</resources>


Once you have done it, now is time for draw the outline.


The full code is as below.
<?xml version="1.0" encoding="utf-8"?>
<LinearLayout xmlns:android="http://schemas.android.com/apk/res/android"
android:orientation="vertical"
android:layout_width="fill_parent"
android:layout_height="fill_parent"
android:layout_weight="1">
<LinearLayout
android:orientation="horizontal"
android:layout_width="fill_parent"
android:layout_height="fill_parent"
android:layout_weight="1">
<TextView
android:gravity="center_horizontal"
android:layout_width="wrap_content"
android:layout_height="fill_parent"
android:text="@string/hello1"
android:background="@color/red"
android:layout_weight="1"/>
<TextView
android:gravity="center_horizontal"
android:layout_width="wrap_content"
android:layout_height="fill_parent"
android:text="@string/hello2"
android:background="@color/green"
android:layout_weight="1"/>
<LinearLayout
android:orientation="vertical"
android:layout_width="fill_parent"
android:layout_height="fill_parent"
android:layout_weight="1">
<TextView
android:gravity="center_vertical"
android:layout_width="fill_parent"
android:layout_height="wrap_content"
android:text="@string/hello3"
android:background="@color/yellow"
android:textColor="#000000"
android:layout_weight="2"/>
<TextView
android:gravity="center_vertical"
android:layout_width="fill_parent"
android:layout_height="wrap_content"
android:text="@string/hello4"
android:background="@color/blue"
android:layout_weight="1"/>
</LinearLayout>
</LinearLayout>

<LinearLayout
android:orientation="vertical"
android:layout_width="fill_parent"
android:layout_height="fill_parent"
android:layout_weight="1">
<TextView
android:gravity="center_vertical"
android:layout_width="fill_parent"
android:layout_height="wrap_content"
android:text="@string/hello5"
android:background="@color/purple"
android:textSize="15pt"
android:layout_weight="1"/>
</LinearLayout>
</LinearLayout>


After run the application, you should get something similar like figure below.


This session is completed. If you found any problem, please drop me a comment or email to me at rickiedroid@gmail.com
Happy Java Android-ing.

Saturday, January 8, 2011

Different font style using HTML tag and change background color

If you have a little knowledge on developing websites before, the below tags will be used commonly such as <i> <b> <u> <a href>. We will also try to change color for words and also the background color of your apps.

Tips: After booting up the emulator, actually no need close it if you want to do another testing, when you click "Run" again, it will reboot the application inside the emulator for you, it saves time.

Did you ever think of what should we do if you want to make some of the words bold, italic, underline or set a hyperlink in your apps?

It is pretty easy actually, go to the res>values>strings.xml, you may see
<?xml version="1.0" encoding="utf-8"?>
<resources>
<string name="hello">O My God,Android, this is the strings.xml!</string>
<string name="app_name">Hello,Android, the string is inside res/values</string>
</resources>


In the above example, you may actually try to insert those tag directly and see the result.
<?xml version="1.0" encoding="utf-8"?>
<resources>
<string name="hello"><b>O My God</b><i>,Android</i>,<u> this is</u> the <a href="rickiedroid.blogspot.com"> strings.xml</a>!</string>
<string name="app_name">Hello,Android, the string is inside res/values</string>
</resources>

Run History > HelloAndroid.java
so what you can see is that
"O My God" become bold,
"Android" become italic,
" this is" is underlined and
"strings.xml" contains a hyperlink rickiedroid.blogspot.com

Notes: In Emulator, the hyperlink is non-clickable and you cannot highlight the words. If I'm wrong on this, please alert me.


To configure the font color, you must add one line in the res>layout>main.xml.
On the right figure, shows there are actually lots of options can be used through auto complete by Eclipse.

In the example, we use textColor to change the font color.

First, we create one more xml file in res>values so that our program will be more organized.

  • To create a xml file, right click on values folder under res, click New>Android XML File


  • Insert a name for the file, File : colors.xml
    Ignore all other selection, click Finish
    A file in res>values>colors.xml is created.


  • To insert a font color, xml element follow this method
    <
    color name="fontname">#Hexvalue</color>
  • So we should insert the xml into the colors.xml like this:
<?xml version="1.0" encoding="utf-8"?>
<resources>
<color name="fontcolor">#4FC32C</color>
<!-- kind of green in Hex value -->
</resources>


  • Go to the res>layout>main.xml to add in one more lines,

<TextView xmlns:android="http://schemas.android.com/apk/res/android"
android:id="@+id/textview"
android:layout_width="fill_parent"
android:layout_height="fill_parent"
android:textColor="@color/fontcolor"
android:text="@string/hello" />


  • So you can see, under the id:textview, string:hello, the text color will follow the color:fontcolor.


  • We now want to change the background color. Add in one more line to set the background color. #ffffff is white color in Hex value

    <TextView xmlns:android="http://schemas.android.com/apk/res/android"
    android:id="@+id/textview"
    android:layout_width="fill_parent"
    android:layout_height="fill_parent"
    android:background="#ffffff"
    android:textColor="@color/fontcolor"
    android:text="@string/hello" />

  • So now we can see what is happened obviously after adding in this line.
This session is complete, you may leave comment if you are confuse or not satisfy with the post. The coming up post will share about how to configure rows and create columns.

Thursday, January 6, 2011

Home Page

This is a blog for new Android Market Developer to learn. It is a good start and welcome to the programming world.

I'll try to update this page once I had learned something new so that you all may get to my notes and knowledge too.

Please join as a follower to follow Rickiedroid using the tool provided on the right to keep track on blog updates.

Why Android developer?

Setup Tutorials
Basic Tutorials

Advance Tutorials

Exercises

Updated 9 April 2011

Tuesday, January 4, 2011

Exercise - Hello World

For better understanding what you have learned, here are some exercises for you.
I'll focus more on using XML layout.

Tips: Good practice is to Run the program by choosing
run as as shown in the figure beside, click on the dropdown and select the *.java file to run. It is to avoid you run the *xml file, because it is messy sometime if you don't know how to handle it. When we saw something like main.out.xml , you are able to delete this file, but you can't run your project anymore. A error message saying "Your project contains error(s), please fix them before running your application". But obviously no error was found by user. What you can do is to "clean" it. In Eclipse, go to Project > Clean.. . Then you are now able to run your application again.

Lets start some revisions
I'll only cover on exercise 1 and 2
i. Create New Project named HelloAndroid
Application name : HelloAndroid
Package name : example.helloworld
1. Edit main.xml with TextView
2. Edit strings.xml resources by adding strings

_____________________________________________________________
A little recap for creating new project and Android Virtual Device (AVD). Create Project
  • File> New> Android Project or Alt+Shift+N > Android Project
  • Fill in Project Name, choose platform, fill in Apps Name, Package Name, Create Activity tag and Min SDK Version (details description may check on the previous post - New Project & Hello World)
Create AVD _____________________________________________________________

1. Edit main.xml with TextView
As we learned on previous tutorial, here are some details explanation to get you understand the concept.

First we copy back the code to the res/layout/main.xml

<?xml version="1.0" encoding="utf-8"?>
<TextView xmlns:android="http://schemas.android.com/apk/res/android"
android:id="@+id/textview"
android:layout_width="fill_parent"
android:layout_height="fill_parent"
android:text="@string/hello" />

What we can see is that on the last line android:text= ="@string/hello" is referring to the tag with string / <string name="hello">, so hello is the name for the tag.

2. Edit Strings.xml resources by adding strings
We do the same, copy the code first.
<?xml version="1.0" encoding="utf-8"?>
<resources>
<string name="hello">O My God,Android, this is the strings.xml!
<string name="app_name">Hello,Android, the string is inside res/values>
</resources>

So as we can see, inside the resources node, the tag string is named="hello" is fed with a sentence.

This string will be called by main.xml. So once you run the apps, the setContentView(R.layout.main) in HelloAndroid.java will display the sentence.
Virtually it should be something like below:


In the next session, we will have more fun playing with font style by using some simple html tag like <u>, <b>, <i>, <a href> and change the color of font and background.

Monday, January 3, 2011

Display Hello World via XML layout

This will not be a long post, instead if you are blur with how to create a new project in Eclipse or cannot understand the below post, you may revise back the previous post > Rickiedroid >HelloWorld

Tips: There are several good links or some news are recommended to surf in the right panel of this blog.

Android think of ways to reduce programmer works, using XML layout is one of it. Previously the one you build and run with those coding, is called "programmatic" UI layout. Of cause a simple Hello World application will not lead to a huge code change, how about a bigger change like building a calculator for example? A little changes in UI may lead to a huge change in back end programming coding.

To start using XML, you must copy and paste the following code.
More Information, may refer here under subtopic Upgrade the UI to an XML layout.
In the Eclipse Package Explorer, expand the /res/layout/ folder and open main.xml (once opened, you might need to click the "main.xml" tab at the bottom of the window to see the XML source). Replace the contents with the following XML:

<?xml version="1.0" encoding="utf-8"?>
<TextView xmlns:android="http://schemas.android.com/apk/res/android"
android:id="@+id/textview"
android:layout_width="fill_parent"
android:layout_height="fill_parent"
android:text="@string/hello"/>


Save the file,
Inside the res/values/ folder, open strings.xml. This is where you should save all default text strings for your user interface.
<?xml version="1.0" encoding="utf-8"?>
<resources>
<string name="hello">Hello, Android! I am a string resource!
<string name="app_name">Hello, Android
</resources>


If you did some changes in the previous tutorial, here you need to change it back, you should see something like this.
package com.example.helloandroid;

import android.app.Activity;
import android.os.Bundle;

public class HelloAndroid extends Activity {
/** Called when the activity is first created. */
@Override
public void onCreate(Bundle savedInstanceState) {
super.onCreate(savedInstanceState);
setContentView(R.layout.main);
}
}


Now you should see something like this.


They is another things in R.java which you may refer to here. But I do not want to confuse myself and you, so maybe this time we will first skip this part, and maybe we will get back later when we need it.

Of course later we must have some more hands on to show we really understood.
if you are just copy and paste the code, but don't really know why, then you must continue with the exercise of Hello World.
Please drop me a comment if any question.

Saturday, January 1, 2011

Create New Project & Hello World

Today topic will cover on how to create a new project in Eclipse (Helios 3.6) with develop an apps called Hello World.
Tips: You may skip any of the sentence with gray in color if you want to have a fast tutorial

*If you are a typical programmer, sure you will know what is Hello World. Hello World is the simplest program/ application that can be ran without error for testing purpose. For me, it is a program that shows the whole picture how an application works. To those who want to know more, this is a full description for it.

Todo List
  1. Create Android Virtual Device(AVD) - one AVD can be used for all applications
  2. Create New Project
  3. Insert programming coding to shows Hello, World! using HelloWorld.java
2. Create New Project
  • In Eclipse, select File > New > Project
  • Expand Android > Android Project and click Next


  • Insert Project Details
    Project Name : HelloWorld
    Application Name : Hello, World
    Package Name : com.example.helloworld (or your own private namespace, that means anything that ease you to memorize for future usage)
    Create Activity : HelloWorld
    Click Finish

    Project Name
    This is the Eclipse Project name — the name of the directory that will contain the project files.
    Application Name
    This is the human-readable title for your application — the name that will appear on the Android device.
    Package Name
    This is the package namespace (following the same rules as for packages in the Java programming language) that you want all your source code to reside under. This also sets the package name under which the stub Activity will be generated.

    Your package name must be unique across all packages installed on the Android system; for this reason, it's important to use a standard domain-style package for your applications. The example above uses the "com.example" namespace, which is a namespace reserved for example documentation — when you develop your own applications, you should use a namespace that's appropriate to your organization or entity.
    Create Activity
    This is the name for the class stub that will be generated by the plugin. This will be a subclass of Android's Activity class. An Activity is simply a class that can run and do work. It can create a UI if it chooses, but it doesn't need to. As the checkbox suggests, this is optional, but an Activity is almost always used as the basis for an application.
    Min SDK Version
    This value specifies the minimum API Level required by your application. For more information, see Android API Levels.
3. Insert programming coding to shows Hello, World! using HelloWorld.java
  • Your project is ready. In Eclipse left panel (Window > Show View > Project Explorer)
    Open the HelloWorld.java located in HelloWorld > src > com.example.helloworld.


  • It should looks something like this:

    package com.example.helloworld;

    import android.app.Activity;
    import android.os.Bundle;

    public class HelloWorld extends Activity {
    /** Called when the activity is first created. */
    @Override
    public void onCreate(Bundle savedInstanceState) {
    super.onCreate(savedInstanceState);
    setContentView(R.layout.main);
    }
    }

  • Lets modify some code above.
    package com.example.helloworld;

    import android.app.Activity;
    import android.os.Bundle;
    import android.widget.TextView;

    public class HelloWorld extends Activity {
    /** Called when the activity is first created. */
    @Override
    public void onCreate(Bundle savedInstanceState) {
    super.onCreate(savedInstanceState);
    TextView tv = new TextView(this); //create object
    tv.setText("Hello, Wolrd!"); //set text
    setContentView(tv); //display object
    //setContentView(R.layout.main); //comment it so that the compiler will not run this line
    }
    }


  • Save changes (Ctrl + S).
    Run the application by select Run > Run (Ctrl + F11)
    Select Android Application.
    You should be able to see something like this.


    That is all for the moment. Next post will be a little bit advance by using xml to show the same result (Hello, World!), it is easier if you are familiar with xml coding.
    Please left a comment if you are confused.